
Rules, rules, rules, we’ve been surrounded by them all our lives and photography is no stranger to rules—though rules don’t run photography, rules exist to guide you to capture better photos, and in photography, rules are breakable, but only after you master them first. Some of the greatest images come from rule breakers, but only because the rule breakers knew the rules first, and while digital photography may rule today, the fundamental rules come from our film days and still apply, no different than the rules of the road when automobiles were first introduced.

This photo slightly breaks the Rule of Thirds, and almost breaks the the Rule of Direction.
In fact, it’s like when you first learn to drive a car, you take “Drivers Ed,” carefully pleasing everyone around you that helps you get that license and first car, then all of sudden, you’re a NASCAR champion driver, Not! NASCAR fame doesn’t come from just learning the rules as it also comes from putting them to use to gain experience. Photography is no different, as normally your greatest photos aren’t created by accident. Great photographs are created because you’ve taken the time to learn the rules and practiced them to gain experience so you can master the rules then break them effectively.
So, let’s look at the some of the most fundamental rules, sometimes called principals of photography, and while you may know them already, a refresher never hurts anyone, especially if you’re out of practice.
Rule of Thirds—The Rule of Thirds is applicable to all forms of photography, but it’s a rule many photojournalists live by to create images with impact. You simply dissect your image capture area, or scene, into three equal parts, both horizontally and vertically, then you place your point of interest, whether it’s a human subject or action, where the intersecting lines meet. This really helps you avoid the placement of your subject or point of interest, in the center of an image.
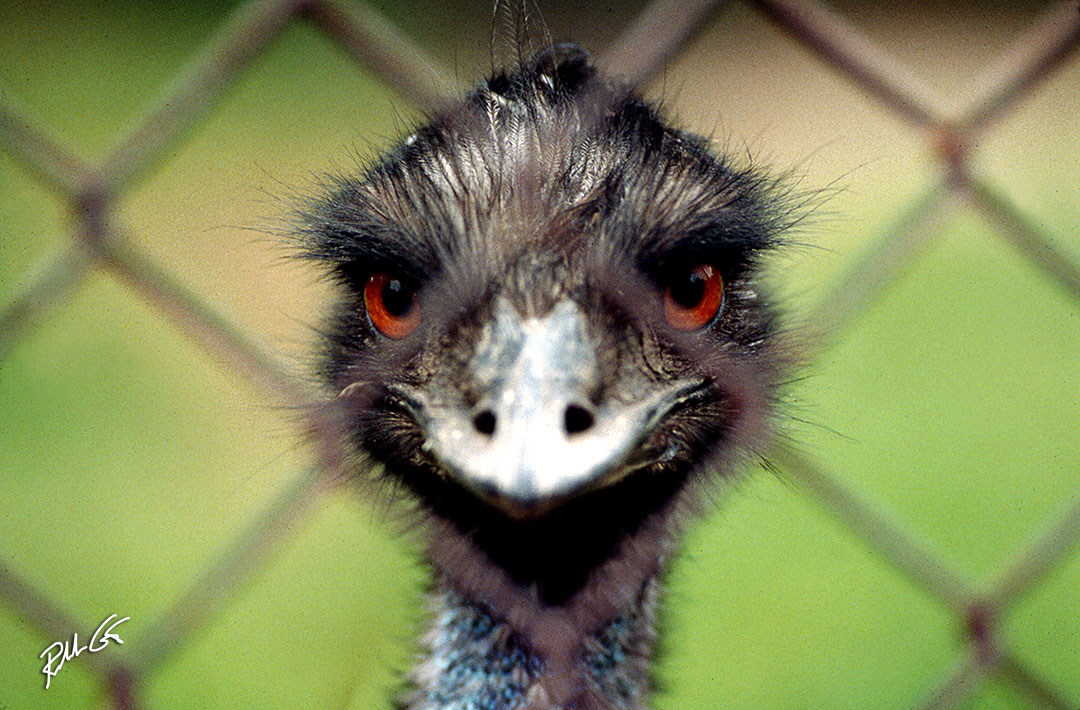
This photo of a female ostrich breaks the Rule of Thirds by centering the subject. The diagonals in the fence allows you to break the rule.
Rule of Direction—Basically, the Rule of Direction is an outcropping of the Rule of Thirds in the sense that if you apply the Rule of Direction, the Rule of Thirds is automatic. In the Rule of Direction, you are basically leaving room in the direction your subject is looking into. In other words, if your subject is looking to the left, you allow more room in in that direction and crop the image from the right—show where your subject or action is looking or going into. In the case of the action going left, the right side of your action or subject is normally wasted space.
Now you see how the Rule of Direction falls into the lap of the Rule of Thirds as your subject or point of interest should automatically fall into where the intersecting lines occur on one side of the image, then look towards the remainder two-thirds of the image. This normally helps illustrate the story, or editorial value, of the image and forces the viewer to go from one side of the image to another, then back to the point of interest in the photo. This literally makes the viewer see the image over and over again, from the point of interest to the directional space, back to the point of interest, then back to the directional space—like a circle, never ending, thus keeping the viewer interested in your photograph for a longer period of time.

In this photo of Tara, we calculated the Sunny 16 Rule to overpower the sun with flash.
Sunny 16 Rule—The Sunny 16 Rule, also known as “I don’t need a stinking light meter when shooting outdoors” rule. Basically, on a bright sunny day, set your shutter speed to your ISO and your aperture value, or f/stop, to 16. Works every time to create a perfect exposure. If the clouds roll in, drop a stop to f/11.
It’s this rule that forces portable lighting manufacturers to sell power packs in either 1200 or 1500 true-watts-second ratings. For normal lighting and shooting distances, a photographer needs at least that much flash power to overpower the sun with flash for normal light modifiers, such as a beauty dish, soft box, umbrella or octabox. Quick note, umbrellas are your weakest light modifier in this situation as you can’t control the light as much and it scatters light all over the place, thus less efficient for this type of outdoor photography.
Rule of Magnification—The Rule of Magnification basically states that your shutter speed should be at least the same or higher number value (in 1/number value format) than your focal length. So, if you’re shooting with a 200mm lens, your shutter speed should be no less than 1/200th of a second. This helps reduce camera shake, even if you use a tripod. Basically, the rule is taking into account that as your focal length increases, you are magnifying everything, including camera shake. With mirrorless cameras, this is not as problematic as it is to DSLR’s.
If you’re using the Sunny 16 Rule to overpower the sun with flash, make sure you do not exceed your sync-speed limited by your camera make and model and that your radio remote release trigger can handle. Not all radio triggers can handle shutter speeds above 1/125th and most cameras do not sync with flash above 1/250th.
90-Percent rule—The 90-Percent Rule simply states that whatever is pure black absorbs 90-percent of the light that strikes it and whatever is pure white, reflects 90-percent of the light that strikes it. Keyword here, “pure,” as not all blacks are black and not all whites are white. Another way to look at this rule is the old photography principal that you should always expose for the highlights and print for the shadows.
This often bites wedding photographers when it comes to camera exposure settings as usually the bride is in a white dress and the groom in a black tuxedo. My advice to a wedding photographer, the only one that matters is the bride—she is the highlight—the groom just wants out of there with nothing but the honeymoon on his mind. Ignore the mother-in-law, she’s just there to flutter her feathers.
Inverse Square Law—The Inverse Square Law simply states, that when the distance between a light source and the subject doubles, the light falling on the subject decreases by a factor of four. The light path also expands out over an area four times greater in width and height. For example, imagine your light meter reads f/11 when your studio light source is five feet from your subject. If you move the light so that it’s 10-feet from the subject, you will reduce the amount of light falling on the subject to ¼ of its previous power—or two full f/stops. For proper exposure of the photo now, you’d have to open up your camera lens to f/5.6, thus allowing four times the light to enter the camera lens then when it was set at f/11.
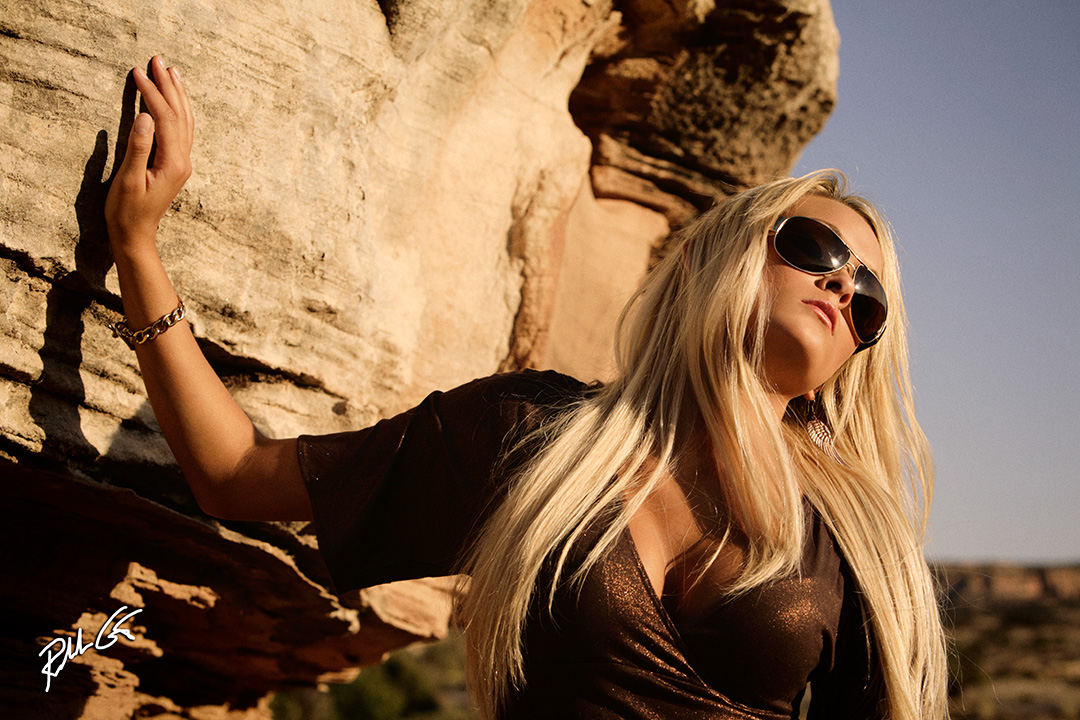
In this photo I used the Law of Reflectance to get the sunshine in Holley’s sunglasses.
The Angle of Incidence is Equal to Angle of Reflection—The Angle of Incidence is Equal to the Angle of Reflection, sometimes called The Law of Reflectance, is a physics law that states that the angle of incidence is equal to the angle of reflection. The tenet is fundamental to the understanding of light and is summarizes thusly: If light strikes an object at angle A, light is then reflected in the opposite direction, also at angle A, similar to the way a ball bounces off a brick wall.
The easiest way to comprehend this concept is to go into a place that has hard, shiny floors and overhead lighting. Look down while you walk and you’ll see hot spots of light on the floor move as you walk. These hot spots are the direct reflection of the overhead lighting. These same equal angles of incidence and reflection can cause hot spots on your subject too—especially from flash. Breaking these angles in your photographs allows you to add or eliminate texture, shape, form, color and contrast in your photos.
This law is responsible for red-eye that plagues photographers using flash—now you know why wedding photographers use camera brackets so their flash units are off axis to the lens. It’s this same law that guarantees ring-flash users red-eye when the lens is placed in the center of the ring—the lens and the flash are at equal angles, thus the hot spot is red because of the blood vessels in the retina of the eye.

In this calendar photo, the model was illuminated with a 7-foot octabox as her main light. The larger the light modifier, the sweeter the light.
One of the great genres of photography that I capitalize on this law is my editorial nude photography where I place my subject where I want her and the light where I want it, then when I photograph the subject, nothing moves but me and my digital camera. A great exercise is to place an orange on a table, light it with a very small light source and move the camera all the way around the orange snapping photos along the way—you will see how the rough orange texture will appear and disappear—provided you do not move anything but the camera and all other room lights are off.
The Rule of Size Does Matter—The Rule of Size Does Matter refers to the physics of light quality and how it’s affected by the size of the original light itself. This is a simple rule but very important when it comes to your intended result. Do you want more contrast in the image, or less? Do you want soft flattering light or harsh, hard light? Basically, the rule states that the larger the light source, the softer and less contrast of the light quality, thus, the smaller the light source, the higher the contrast in the image and the harsher or harder the light source.
This is important based on what type of subject you’re photographing. If you’re taking portraits, glamour shots or nudes of women, go with the largest light modifier possible. When photographing men, go with the harder light source—this creates a more rugged, masculine look for any man. The same goes with product photography, normally you want every detail in a product, so you would light your product with light that provides more contrast within the image, or a smaller light source. Basically, you wouldn’t normally light a wedding ring with a 7-foot, Chimera Octa57 box, you’d use a smaller soft box or a 7-inch reflector with a 10-degree grid.
Rule of Stops—The Rule of Stops basically is often called the Rule of Exposure. From our film days, full- or half-stops were determined by halving or doubling shutter-speeds or aperture values. By changing one, we affect the other, in other words, if our proper exposure called for 1/60th at f/11, then the equivalent to maintain the same exposure would either be 1/125th at f/8 or 1/30th at f/16. Here are some traditional, commonly used “stops” for helping you determine proper camera exposure:
Shutter-speed stops: 1sec., 1/2sec., 1/4sec., 1/8sec., 1/15sec., 1/30sec., 1/60sec., 1/125sec., 1/250sec., 1/500sec., 1/1000sec, 1/2000sec and 1/4000sec.
Aperture values: f/2.8, F/4, f/5.6, f/8, f/11, f/16
Example equivalents: 1/500th at f/2.8 is the same as 1/250th at f/4; 1/125th at f/5.6; 1/60th at f/8; 1/30th at f/11; or 1/15th at f/16
Rolando’s Rule—Rolando’s Rule is not really named after me, it’s more the mentality used by any great photographer and expected by top photo editors around the world and really known as, “Get it right in the camera!” No spraying and praying. No crutches. Like, “I’ll fix it in Photoshop.” Adobe® Photoshop® is meant to perfect your images, not create them for you. It’s a photographer’s tool, based on, but better than the traditional darkroom. Photoshop® is there to interpret, improve, intensify, and instill truth in the image based on how you saw it. Photoshop® is not there, for photographers, to create something that wasn’t there to begin with—if you use it in that manner, then you are either a photo-illustrator or an image-maker, not a true photographer.
Now these are just ten fundamental rules of photography, as there are many rules, fundamentals and concepts professional photographers master to create their masterpieces. It would take me at least an entire photography book to write them all out, and since this is a photoblog post, I’ve got to end somewhere as this is already longer than a NASCAR racetrack. So please enjoy it, use it, and pass it on to your colleagues and friends.

